In Spotkin’s Game, Contraption Maker, we wanted to add multiplayer support so that people could build cool contraptions together online. Some indie games that have multiplayer support simply ask you to enter the IP address of the server to connect to. This usually requires modifying your router configuration to allow port forwarding, or to set up a server on a public IP address. We wanted it to be a simpler experience, where one person just creates the server with a name like “Keith’s Server” and then another person can find that server in a list on their copy of the game and join. I found some great resources online that describe how to do this, which are listed at the end of the article.
Nothing in this post is groundbreaking, but the NAT punch-through trick is a bit, well, tricky – and I think another attempt to explain it might benefit someone out there trying to implement it for their game.
I should also point out that Contraption Maker is using UDP, and that although NAT punch-through can be done using TCP, I have no experience getting that to work. All of the advice in this post pertains to UDP only.
How NAT Works
If your computer is connected directly to the Internet, then you don’t need to worry about stuff like NAT punch-through. However, once you have a router sitting between your computer and the internet, your computer no longer has a public IP address. Instead, it is getting its IP address from the router. Your computer communicates with the rest of the Internet using what is called NAT: Network Address Translation. NAT is great – it allows multiple devices in your home to share a single public IP address and protects those devices from network attacks from other computers. The downside of NAT is that it makes it a bit trickier to connect your computer to your friend’s computer so you can play games.
The way NAT works is that the router gives out special “private” IP addresses to your computers on one side of the router, while hanging on to a single public IP address on the “public” facing side of the router. When the packets pass through the router going out, it rewrites the source address in the packets, replacing the private address with the public IP address. When packets come back in from the outside, it rewrites the destination packet IP address, putting the private IP back in.
Typically the router is blocking all incoming traffic. But obviously it has to let some traffic in. Otherwise your browser couldn’t load any web pages. The way the router decides what traffic to let through is simple: if the router first sends a packet to another computer, the router remembers that you initiated the connection and allows returning packets back through.
How does the router recognize the returning packets and know to let them through? The answer is that there is a second part of every internet connection in addition to the IP address – a port, which is really just another number. When your browser makes a connection to a public web site, as the packets leave the router with the public IP address, the router also attaches a port number to those packets. The port number could be any valid port number (65535 is the maximum) – it doesn’t matter what it is. When the web server sends packets back, they are addressed to the public IP address of your router and the port that the router attached to the outgoing packets.
The port is used once again when the router decides which private IP address to put back into the packet before it sends it onto the private network, where your computer will be able to retrieve it. It remembers the port that your computer attached to the very first packet that came from your computer and arrived at the router and keeps a mapping table from that port to the port on the public side of the router that it chose to write into the packet it sent out the public side.

How NAT Punch-through Works
Knowing how NAT works, we now have a way to get two computers on the Internet, both behind NAT routers, to talk to each other. If I know which port your router is going to choose when your router starts sending packets to me, and you know which port my router is going to choose when it starts sending packets to you, then we can communicate. The trick is that the first packet that each router sends might be blocked by the other router. But then packets after that will succeed, because once a router sends packets to an IP address / port, it will allow packets from that IP address / port back in.
But how can your computer know what port my router is going choose and how can my computer know what your router is going to choose? This is where the master server comes in. The master server is a server running on a computer with a public IP address. It is not behind a router. Both of our computers, sitting behind their respective routers, will connect to the master server. The master server will keep track of which ports our routers have chosen and tell the other computer which port to use.
Now for a concrete example. I create a Contraption Maker (CM) server, and my instance of Contraption Maker connects to the master server. The packet leaves my computer and travels through my router. The packet leaving my router picks up a randomly chosen port from my router. This packet travels to the master server, and the master stores the IP address and the port that the packet came from. Now the master server knows where my Contraption Maker server lives. I tell it what the name of my server is, how many players it supports, etc.
Now your computer connects to the master server and asks for a list of Contraption Maker game servers. The master server sends your computer a list containing my CM server’s IP address and the port that my router chose. At this point you can select my server and request a connection. But wait a second – if your computer sent a packet to the IP:Port given to it by the master server, it would be rejected by my router! Why? Because my router still doesn’t know who you are. My router needs to send a packet to YOUR router before it will let packets in from your router.
So we need the master server once again. Your Contraption Maker game sends another packet to the master server saying “Hey – tell this game server that I want to talk to it.” The master server sends a packet to my CM game (which gets through the router because I initiated a connection with the master server). This packet contains the IP address and port on the public side of YOUR router. Now my CM server sends your router a packet, and now the next packet your computer tries to send to mine will get through. We are connected!
Confusing? It is. Here are some diagrams that illustrate the steps.
Step 1: Keith and Jon’s computers are behind their respective routers and start up Contraption Maker.
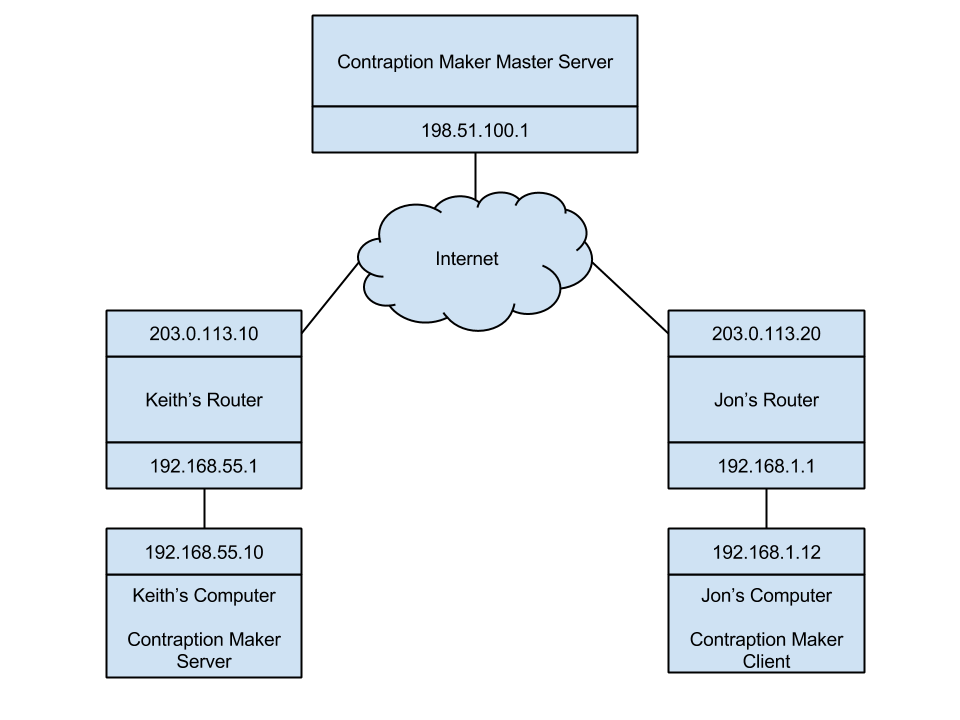
Step 2: Keith starts up the Contraption Maker Server, which registers it with the Contraption Maker master server.

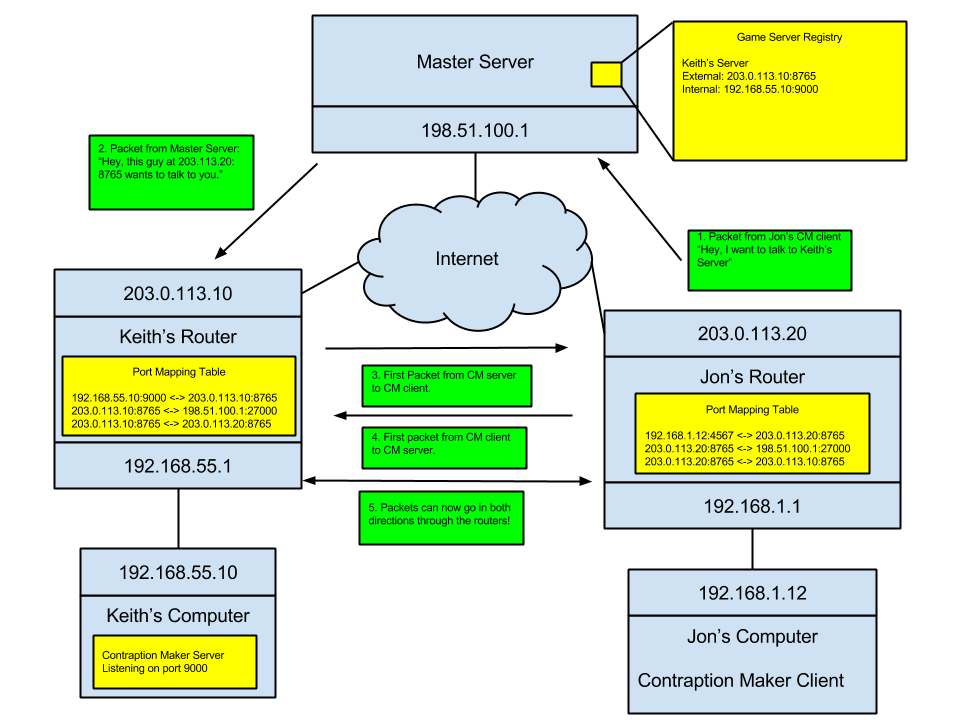
Step 3: Jon’s Contraption Maker client requests the list of game servers from the Contraption Maker master server. Then it sends a packet to the master server saying that it wants to connect to Keith’s CM server. The master server sends a packet to Keith’s CM server telling it that Jon’s computer wants to connect to it. The CM server and client both then try to connect to each other, which triggers the routers on both sides to allow the packets through.
Gotchas
1. Sometimes routers will not let traffic leave and come right back in on the public side of the router. This is called “router hairpinning”. In that case, if both computers are actually behind the same router, you will have to fall back to using the internal IP address instead of the external IP address when connecting from the client to the server.
2. Another important thing to know is that these port mapping entries in the routers can be deleted if they do not get used, so you should keep sending heartbeat packets from the game server to the master and from the game client to the game server to keep the connection alive.
3. Ben Garney, when reviewing this post, mentioned that it is a good idea for the master server to hand out a key (or nonce) to the game server and clients that can be used to verify that the client is connecting to the game server it thinks it is connecting to. This idea is discussed further in http://www.brynosaurus.com/pub/net/p2pnat/.
4. There is a type of NAT router for which this technique will not work. It’s called a symmetric NAT router. Unfortunately there is no way to get any kind of NAT traversal working with a symmetric NAT router and you will have to use port forwarding or a relay server to forward all traffic. Fortunately, most routers do not use symmetric NAT.
Finally, for a more detailed examination of NAT punch-through, I highly recommend this paper: http://www.brynosaurus.com/pub/net/p2pnat/. If I had found this paper, which has some really great diagrams, before writing this blog post, I might not have bothered to write it in the first place!
Resources:
http://www.brynosaurus.com/pub/net/p2pnat/
http://www.mindcontrol.org/~hplus/nat-punch.html
http://www.raknet.net/raknet/manual/natpunchthrough.html


